
Start with one photograph.
Open Mini Camera and allow camera access. Select Photo, then bring a subject into the preview. Start with the 1x camera and the HARD look to try a setup close to the app defaults before making adjustments.
Choose something with a clear shape against its background: a mug, a leaf or the outline of a building in good light. Make that one subject prominent in the frame. Watch the processed preview, press the shutter, and allow the app to add the result to your photo library when prompted.
Choose a shape for 160×144 pixels.
The processing canvas is 160 pixels wide and 144 pixels tall. Its 10:9 ratio is slightly wider than a square. The camera image is center-cropped to fit, so compose using Mini Camera’s preview rather than assuming it matches the standard iPhone camera view.
Small text and distant, intricate textures can disappear into a low-resolution image. When the subject becomes hard to recognize, try reducing the background, moving a little closer or changing your angle. These are shooting suggestions, not a guarantee that every scene will look the same.
The app supports front/rear camera switching and lens options labeled 0.5x, 1x and 2x where the hardware makes them available. Not every iPhone has every option. Work with the cameras your device provides and pay attention to the shape inside the frame.
SOFT, CLASSIC or HARD?
The three looks do more than apply different contrast values. They vary the strength of ordered dithering—the small dot pattern that suggests additional tones—and the tonal response. Every look still produces four monochrome shades.
SOFT uses gentler dithering, CLASSIC sits in the middle, and HARD uses stronger dithering. HARD is the default. Keep the subject still while switching looks and compare both the brighter areas and the shadows.
Changing the look, brightness and contrast all at once makes it harder to tell what helped. Pick a look first. Then adjust brightness, followed by small contrast changes, until the live preview has the character you like.
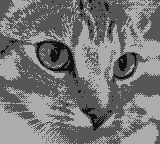
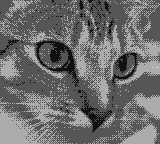
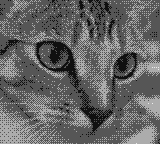
Illustrative processing sample. Not captured with the iPhone app. About these images
Make small changes to the light.
When the subject turns into a dark block, raise brightness a little. If a bright area becomes too large and loses its outline, lower brightness and watch for the shape to return.
Try raising contrast when the subject blends into its background. Try lowering it when you want to keep more information in the shadows. Use the four-tone preview as your guide rather than treating a particular number as the right answer.
Four shades cannot preserve every subtle highlight and shadow at once. Moving the subject, changing the lighting or changing where you stand can be as useful as changing a setting. Mini Camera remembers its look and tuning values, so check whether yesterday’s settings still suit today’s scene.
Choose video or a GIF loop.
Use Video for a short moment with sound. The free version supports 12fps and up to 10 seconds. A one-time Pro purchase adds 30fps and videos up to 30 seconds. The subject and device conditions affect the result; check both the preview and the saved capture.
GIF is for a short, silent loop. Free GIFs use 12fps; Pro also offers 30fps. A small movement that looks natural when repeated is a useful starting point. The Pro video limit of 30 seconds is separate from the GIF limit. Check the time limit shown in the capture screen.
Recording sound requires microphone permission. When the microphone is denied or unavailable, the app offers a choice to continue with silent video or open Settings. GIF has no audio and does not need microphone permission.
Find your captures in Photos.
Successfully saved photos, videos and GIFs are added to the iPhone Photos app. Still photos preserve the 160×144 pixel design at an 8× output size of 1280×1152. This makes each pixel larger; it does not add new detail to the original scene.
The album inside Mini Camera is for reviewing and sharing captures from the current session. It is not a permanent, complete photo-library browser. After closing the app, use the iPhone Photos app to find captures that were successfully saved.
When saving fails, check permission to add to Photos and available device storage. Sharing services can compress images or handle GIF playback differently, so keep the original saved file when a result matters to you.
Find something interesting. Take the picture.
The same scene can feel different with another look or a little more light. Start with one thing in front of you.
Download on the App Store